Re-cap - Tip #1: Regular butter works just as good as the "special" flax seed oil or olive oil butter.
Tip #2: This recipe calls for Omega-3 eggs. Again, I don't usually buy these eggs I get the regular kind and they work just as well.
Tip #3: Another ingredient change...it calls for raisins. Yuck! Not a fan. I use chocolate chips instead. The mini kind because they're cuter.
Tip #4: When you're sifting together the dry ingredients, the brewer's yeast doesn't sift very well. At least mine doesn't. Everything will sift out and the yeast is left behind. I just use my fingers and grind it up against the sifter to break it up a little. I'll do that until there's not a ton left and then I just dump the little bit left in the bowl. It'll be ok.
Tip #5: In the comments I've read on these recipes there's always someone that asks about how many cookies to expect out of a batch. Every time the author says about 2 dozen. In my experience that's WAY underestimating. So far I've gotten between 65-70 cookies, the batch I just made today came out with 72! That's A LOT of cookies.
- Subtip #5: It's recommended that you eat up to 5 cookies per day. I've noticed among commenters that calories are important. I put this recipe into MyFitnessPal using 1 cookie as 1 serving and getting about 65 cookies out of a batch. So 1 batch = 65 servings. Ladies and Gents this works out to be 66 calories per serving! What?! Healthy cookies?? What is this magic? Isn't it awesome! Bonus - nursing takes up about 300-500 calories per day, so eating 5 cookies you'll take in 330 calories per day just from the cookies. Easily burned off JUST from nursing! No extra miles on the treadmill required! You're welcome!
Alright so if you're making these as we're going along I have some pictures for you too once your dough is made. Mine seems to always come to the consistency of a slightly runny oatmeal cookie dough. When I'm ready to start baking these bad boys I pull out all of my cookie sheets (I have 4) and line them with parchment paper. I LOVE parchment paper. First because it makes clean up super easy! The second reason I'll give you in a minute.
I scoop out my dough using a Tablespoon measuring spoon. I don't quite fill it all the way, but I don't level it either. It looks something like this:
Ok so drop those onto your parchment lined cookie sheet about 1 inch apart. Bake.
Mine are usually good after 12 minutes. These ones have about 5 minutes left:
After they are done and you've pulled them out of the oven I slide the whole sheet of parchment off the cookie sheet and put it on the counter to cool. That way I can let the cookie sheet cool a little before I put a NEW sheet of parchment on for more cookies.
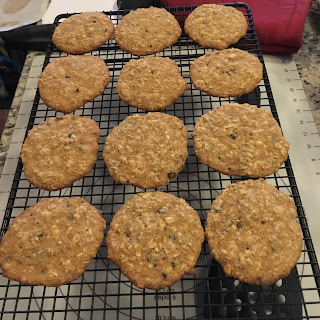
Once the cookies have cooled a little transfer them to a cooling rack.
Here's a size reference so you know about how big they are when they are done. About palm sized:
Alright remember that second reason I love parchment paper? Here it is. Now that your cookies are baked and on a cooling rack you have perfectly spaced and sized circles on the paper.
Tip #7: Cut the parchment paper up into squares around the circles left behind by the cookies. Put each cookie on its own square and they won't stick together when you store them!
Store the cookies in Ziploc bags with 5 in each bag. Don't forget that parchment paper!
That's it! They are pretty yummy cookies. Good luck and I hope this was helpful!


